[빅데이터와 정보검색] 4주차 ElasticSearch
p2. ElasticSearch
- Elastic 창시: 2012년, 4인의 멤버가 회사로 설립
- 2004년 샤이 배논(Shay Bannon)
- 요리 레시피 검색엔진을 개발 후 아파치 루씬(Apache Lucene)을 적용하려던 중 루씬이 가진 한계를 발견
- 루씬의 한계를 보완하기 위해 새로운 검색엔진 프로젝트로 ElasticSearch 출발
- 창시 멤버: 샤이 배논, 스티븐 셔르만(Steven Schuurman), 우리 보네스(Uri Boness), 사이먼 윌너(Simon Willnauer) 4인의 멤버가 회사로 설립
- 2004년 샤이 배논(Shay Bannon)
- Elasticsearch는 자바로 만들어진 루씬 기반의 오픈 소스 검색 엔진
- 뛰어난 검색능력과 대규모 분산 시스템을 구축할 수 있는 다양한 기능들을 제공
p3. ElasticSearch
- Elasticsearch는 자바로 만들어진 루씬 기반의 오픈 소스 검색 엔진
[특징]
- 오픈소스 (open source) (GitHub 링크), Apache 2.0 라이선스로 배포
- 실시간 분석 (real-time): 실시간에 가까운 속도로 색인된 데이터의 검색, 집계가 가능
- 전문(full text) 검색 엔진
- 루씬은 기본적으로 역파일 색인(inverted file index)라는 구조로 데이터를 저장
- Elasticsearch도 루씬 기반 위에서 개발되어 색인된 모든 데이터를 역파일 색인 구조로 저장
- JSON 형식으로 데이터를 전달, 내부적으로는 역파일 색인 구조로 저장
- Elasticsearch에서 질의(query)에 사용되는 쿼리문이나 결과도 모두 JSON 형식으로 전달되고 리턴
- RESTFul API
- 마이크로 서비스 아키텍처(MSA)를 기본으로 설계
- Rest API를 기반으로 지원하며 모든 데이터 조회, 입력, 삭제를 HTTP 프로토콜을 통해 처리
- 멀티테넌시(multitenancy)
- 데이터들은 인덱스(Index)라는 논리적 집합 단위로 구성되며, 서로 다른 저장소에 분산되어 저장
- 서로 다른 인덱스들을 별도의 커넥션 없이 하나의 질의로 묶어서 검색하고, 결과들을 하나의 출력으로 도출
p4. ElasticSearch의 논리적 구조
| Elasticsearch 개념 | RDBMS 대응 | 설명 |
|---|---|---|
| Cluster | Database Server 전체 | 여러 인덱스를 포함하는 하나의 검색/저장 시스템 단위 |
| Index | Database | 문서를 저장하는 논리적 공간 (특정 주제별, 서비스별로 나눔) |
| Type (deprecated) | Table | 하나의 인덱스 안에 있는 여러 문서를 묶어서 타임이라는 논리 단위. 현재는 사용되지 않음 |
| Document | Row (Record) | JSON 형식의 데이터 레코드 |
| Field | Column | 문서(Document)의 속성(키-값) |
| _id | Primary Key | 인덱스 내 문서에 부여되는 고유한 구분자. 인덱스 이름과 _id 조합은 Elasticsearch 클러스터 내에서 고유함 |
| Mapping | Schema | 필드의 자료형 정의 (text, keyword, date, number 등) |
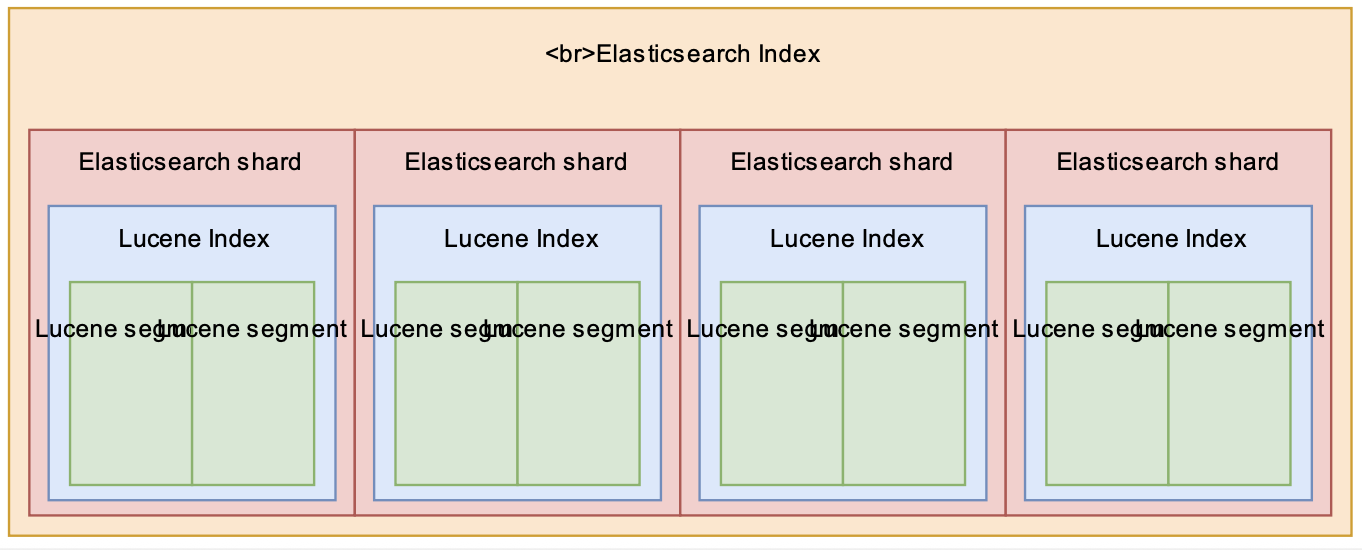
p5. ElasticSearch의 물리적 구조
| Elasticsearch 개념 | 설명 |
|---|---|
| Node | Elasticsearch가 실행되는 단일 서버/프로세스. 클러스터에 여러 노드 참여 가능. |
| Cluster | 하나 이상의 노드가 모여 이루는 전체 시스템. 클러스터 이름으로 구분. |
| Shard | 인덱스를 나누어 저장하는 단위(분산 저장). 검색·색인을 병렬 처리 가능. |
| Primary Shard | 원본 데이터를 저장하는 샤드. |
| Replica Shard | Primary Shard의 복제본. 장애 대비/로드 밸런싱에 사용. |
| Gateway | 클러스터가 재시작될 때 인덱스와 샤드를 복구하는 저장소 역할. |
p6. Elasticsearch RestAPIs
| 엘라스틱서치에서 사용하는 HTTP 메서드 | 기능 | 데이터베이스 질의 문법 |
|---|---|---|
| GET | 데이터 조회 | SELECT |
| PUT | 데이터 생성 | INSERT |
| POST | 인덱스 업데이트, 조회 | UPDATE, SELECT |
| DELETE | 데이터 삭제 | DELETE |
| HEAD | 인덱스의 정보 확인 |
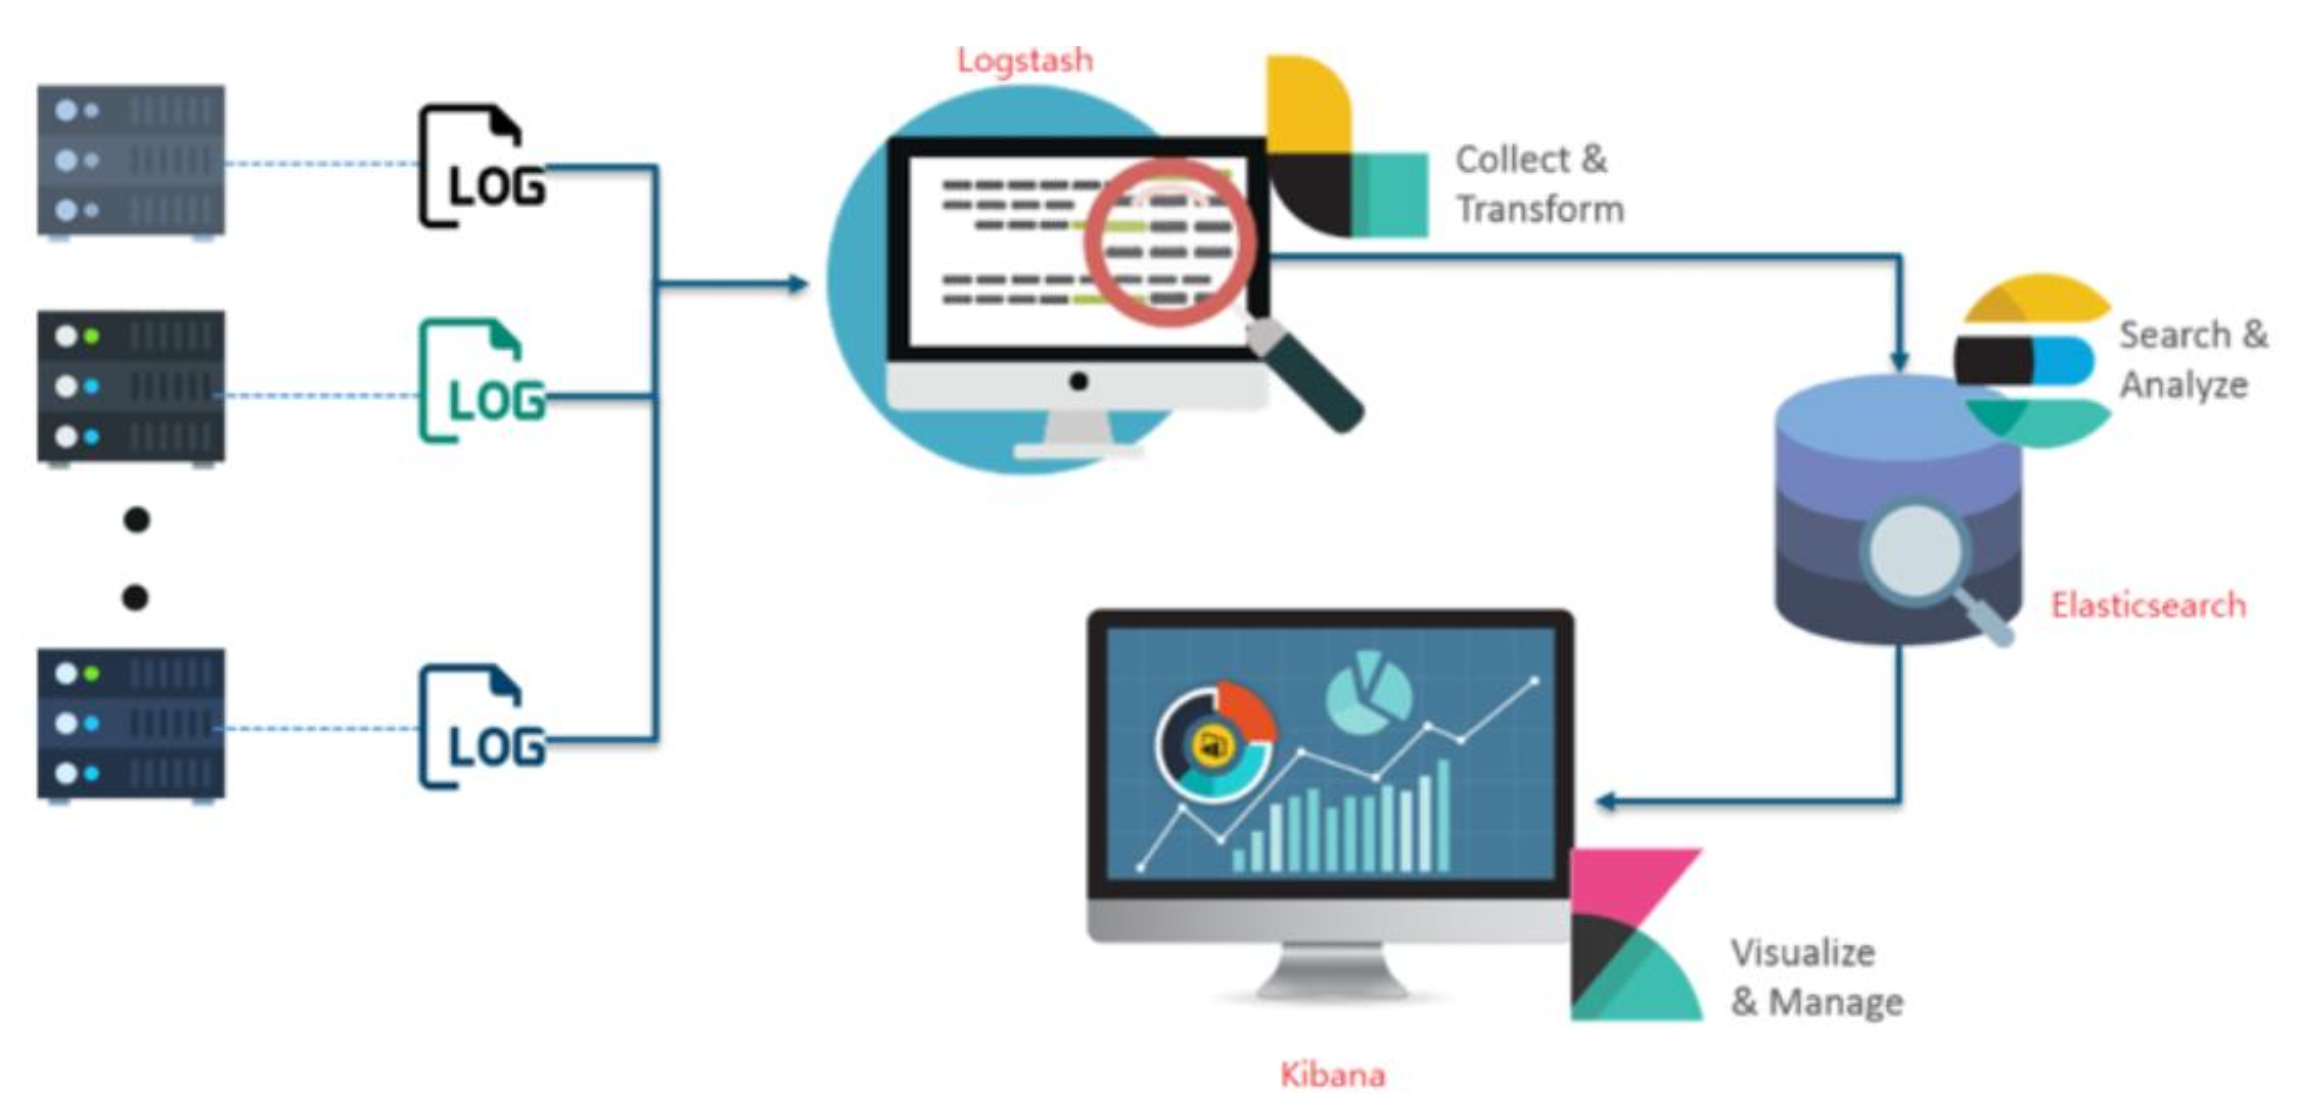
p7. ELK stack
- Logstash/Beats
- 역할: Ingest(수집)
- 다양한 소스(DB, CSV, Log 등)으로부터 데이터를 가져다, 조작 후 Elasticsearch에게 전달하는 역할
- Elasticsearch
- 역할: Store, Search, Analyze
- 직접 수집한 데이터 또는 Logstash으로 수집한 데이터를 관리, 조작(검색)
- Kibana
- 역할: Visualize(시각화), Manage(관리), Bulk 데이터 입력
- Elasticsearch의 데이터를 시각화하거나 편리하게 조작 기능을 제공
- GUI 환경을 제공한다
p8. ELK stack
p9. ElasticSearch
Elasticsearch는 자바로 개발, 자바 실행이 가능한 환경이라면 어디서든 구동
- Windows 설치 및 실행
- https://www.elastic.co/downloads/elasticsearch
- 엘라스틱서치 압축 파일 다운로드 -> 압축 해제
- https://www.elastic.co/downloads/elasticsearch
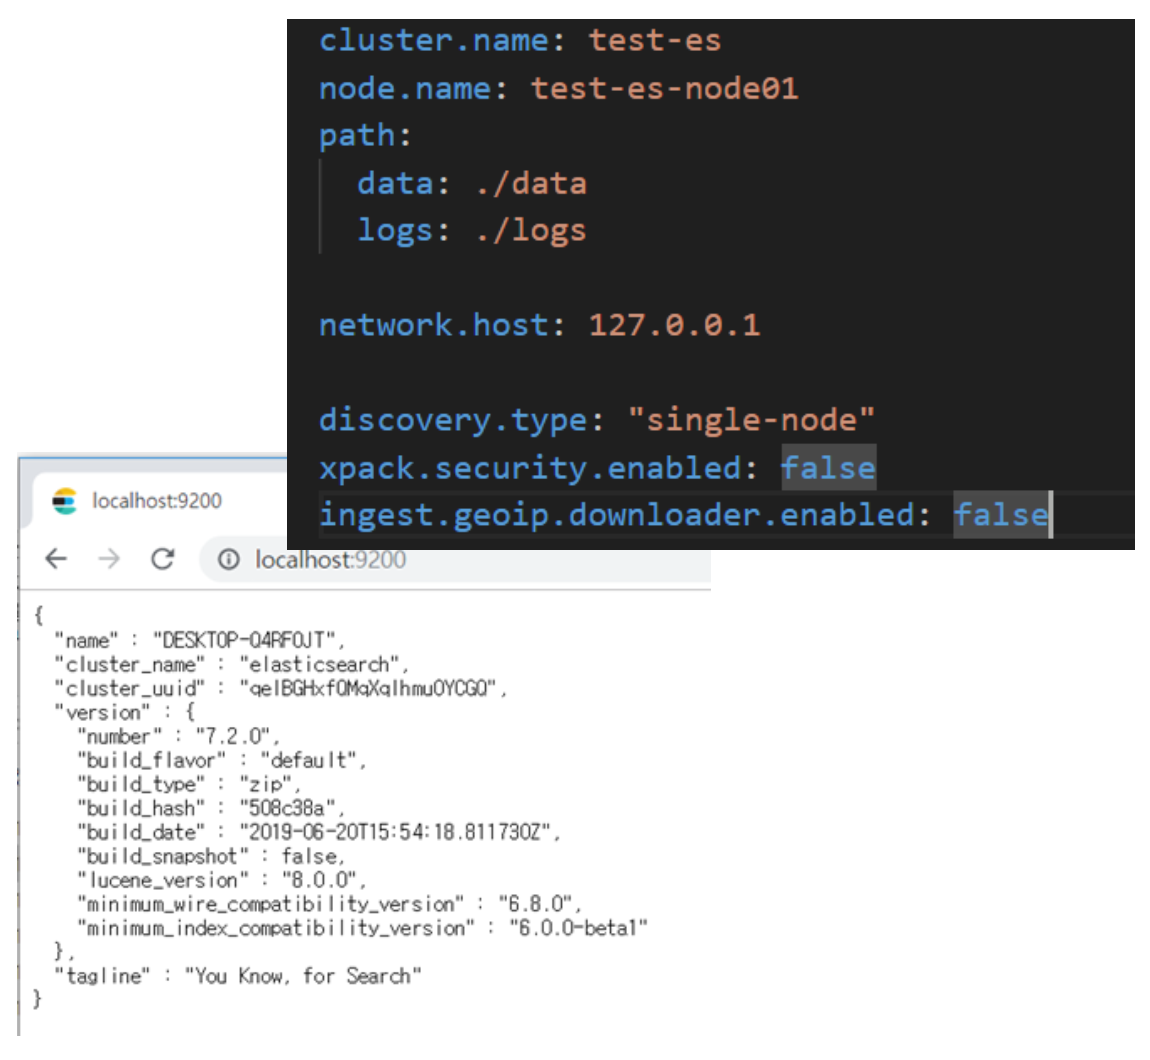
- 엘라스틱서치 설정
- Elasticsearch 설치경로 → config 이동 → elasticsearch.yml 편집
- Data path 및 log path 지정
- Network host(localhost)와 http Port(9200) 지정
- Elasticsearch 설치경로 → config 이동 → elasticsearch.yml 편집
- Elasticsearch 실행
- bin\elasticsearch
- 브라우저에서 조회
- http://127.0.0.1:9200/
- 서비스 설치 및 시작
- bin\elasticsearch-service.bat install
- bin\elasticsearch-service.bat start
- http://127.0.0.1:9200/ 에 접속하여 확인
- 서비스 종료
- bin\elasticsearch-service.bat stop
p10. ElasticSearch
Java 버전 확인

CRUD : REST API 를 사용해서 데이터 색인, 조회 및 삭제
도큐먼트 생성
- 명령어
1
2
curl -XPUT "http://localhost:9200/my_index/_doc/1" -H "Content-Type: application/json" -d "{ \"message\":\"안녕하세요
Elasticsearch\" }“
- 출력 결과
1
{"_index":"my_index","_id":"1","_version":1,"result":"created","_shards":{"total":2,"successful":1,"failed":0},"_seq_no":0,"_primary_term":2}
- 명령어
도큐먼트 조회
- 명령어
1
curl -XGET http://localhost:9200/my_index/_doc/1
- 출력 결과
1
{"_index":"my_index","_id":"1","_version":1,"_seq_no":0,"_primary_term":2,"found":true,"_source":{ "message":"안녕하세요 Elasticsearch" }}
- 명령어
도큐먼트 수정
- 명령어
1
2
curl -XPUT "http://localhost:9200/my_index/_doc/1" -H "Content-Type: application/json" -d "{ \"message\":\"안녕하세요
Elasticsearch Stack\" }“
- 출력 결과
1
{"_index":"my_index","_id":"1","_version":2,"result":"updated","_shards":{"total":2,"successful":1,"failed":0},"_seq_no":1,"_primary_term":2}
- 명령어
도큐먼트 삭제
- 명령어
1
curl -XDELETE http://localhost:9200/my_index/_doc/1
- 출력 결과
1
{"_index":"my_index","_id":"1","_version":3,"result":"deleted","_shards":{"total":2,"successful":1,"failed":0},"_seq_no":3,"_primary_term":3}
- 명령어
인덱스 삭제
- 명령어
1
curl -XDELETE "http://localhost:9200/my_index"
- 출력 결과
1
{"acknowledged":true}
- 명령어
p11. ElasticSearch
1-1 도큐먼트 색인
1
2
3
4
curl -XPUT "http://localhost:9200/my_index/_doc/1" -H 'Content-Type: application/json' -d'
{
"message":"안녕하세요 Elasticsearch"
}'
1-2 도큐먼트 조회
1
curl -XGET "http://localhost:9200/my_index/_doc/1"
1-3 도큐먼트 색인 : 기존 도큐먼트에 업데이트
1
2
3
4
curl -XPUT "http://localhost:9200/my_index/_doc/1" -H 'Content-Type: application/json' -d'
{
"message":"안녕하세요 Elastic Stack"
}'
1-4 도큐먼트 색인 : ID 자동 생성
1
2
3
4
curl -XPOST "http://localhost:9200/my_index/_doc" -H 'Content-Type: application/json' -d'
{
"message":"안녕하세요 Kibana"
}'
1-5 도큐먼트 삭제
1
curl -XDELETE "http://localhost:9200/my_index/_doc/1"
1-6 인덱스 삭제
1
curl -XDELETE "http://localhost:9200/my_index"
p12. Kibana
- Kibana 설치 및 실행
- Kibana 설정 및 실행
kibana-9.1.4/config/kibana.yml수정
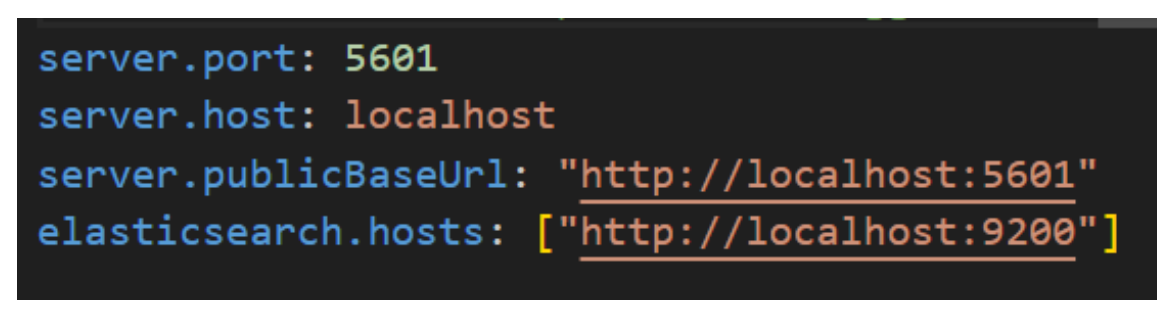
kibana-9.1.4/bin/kibana.bat실행
- 접속
- http://localhost:5601 에 접속
- Elasticsearch 실행된 상태여야 함
- 해당 페이지에서
try sample data버튼을 통해 데이터 입력
- http://localhost:5601 에 접속
p13. Elasticsearch 설치 및 실행(Docker 사용)
- 사전준비
- Windows 10/11 (WSL2 사용 권장) + WSL2가 설치·활성화
- Docker Desktop(Windows) 설치 및 WSL 통합
- 충분한 메모리(개발용 최소 4GB)
- 필수 커널 설정: vm.max_map_count
- Elasticsearch 실행 전 호스트 커널 파라미터
vm.max_map_count값을 ≥ 262144 설정
- Elasticsearch 실행 전 호스트 커널 파라미터
1
2
3
4
5
6
# PowerShell
wsl -d docker-desktop -u root -- sysctl -w vm.max_map_count=262144

# 또는 interactive
wsl -d docker-desktop -u root
# >> sysctl -w vm.max_map_count=262144
-간단한 빠른 시작(한번만 테스트)
1
2
3
4
5
docker run --name es01 -p 9200:9200 -p 9300:9300 \
-e "discovery.type=single-node" \
-e "ELASTIC_PASSWORD=changeme" \
-e "ES_JAVA_OPTS=-Xms1g -Xmx1g" \
docker.elastic.co/elasticsearch/elasticsearch:<ES_VERSION>
p14. Elasticsearch 설치 및 실행(Docker 사용)
아래 방법으로 설치되지 않는 경우 공식 문서에 따른 설치 방법 참고
- docker-compose로 설정
(개발용 single-node + Kibana 예시)
파일명:docker-compose.yml
(현재 디렉터리에 저장)
1
2
3
4
5
6
7
8
9
10
11
12
13
14
15
16
17
18
19
20
21
22
23
24
25
26
27
28
29
30
31
32
33
34
35
36
version: '3.8'
services:
  elasticsearch:
    image: docker.elastic.co/elasticsearch/elasticsearch:<ES_VERSION>
    container_name: es01
    environment:
      - node.name=es01
      - cluster.name=es-docker-cluster
      - discovery.type=single-node
      - bootstrap.memory_lock=true
      - "ES_JAVA_OPTS=-Xms1g -Xmx1g"
      - ELASTIC_PASSWORD=changeme
    ulimits:
      memlock:
        soft: -1
        hard: -1
    volumes:
      - esdata:/usr/share/elasticsearch/data
    ports:
      - "9200:9200"
      - "9300:9300"

  kibana:
    image: docker.elastic.co/kibana/kibana:<ES_VERSION>
    container_name: kib01
    environment:
      - ELASTICSEARCH_HOSTS=https://elasticsearch:9200
      - ELASTICSEARCH_USERNAME=elastic
      - ELASTICSEARCH_PASSWORD=changeme
    ports:
      - "5601:5601"
    depends_on:
      - elasticsearch

volumes:
  esdata:
- 시작
1
docker compose up -d
실행방법
Elasticsearch: http://localhost:9200
(ID: elastic, PW: changeme)Kibana: http://localhost:5601
Elastic Search 공식 문서에 따른 docker-compose 설치 방법
1. .env 파일 생성
1
vi .env
- 아래 내용을 붙어 넣고 파일 저장
1
2
3
4
5
6
7
8
9
10
11
12
13
14
15
16
17
18
19
20
21
22
23
24
25
26
27
28
29
# Password for the 'elastic' user (at least 6 characters)
ELASTIC_PASSWORD=changeme

# Password for the 'kibana_system' user (at least 6 characters)
KIBANA_PASSWORD=changeme

# Version of Elastic products
STACK_VERSION=9.1.2

# Set the cluster name
CLUSTER_NAME=docker-cluster

# Set to 'basic' or 'trial' to automatically start the 30-day trial
LICENSE=basic
#LICENSE=trial

# Port to expose Elasticsearch HTTP API to the host
ES_PORT=9200
#ES_PORT=127.0.0.1:9200

# Port to expose Kibana to the host
KIBANA_PORT=5601
#KIBANA_PORT=80

# Increase or decrease based on the available host memory (in bytes)
MEM_LIMIT=1073741824

# Project namespace (defaults to the current folder name if not set)
#COMPOSE_PROJECT_NAME=myproject
2. docker-compose.yml 생성
1
vi docker-compose.yml
- 아래 내용을 붙여 넣고 파일 저장
1
2
3
4
5
6
7
8
9
10
11
12
13
14
15
16
17
18
19
20
21
22
23
24
25
26
27
28
29
30
31
32
33
34
35
36
37
38
39
40
41
42
43
44
45
46
47
48
49
50
51
52
53
54
55
56
57
58
59
60
61
62
63
64
65
66
67
68
69
70
71
72
73
74
75
76
77
78
79
80
81
82
83
84
85
86
87
88
89
90
91
92
93
94
95
96
97
98
99
100
101
102
103
104
105
106
107
108
109
110
111
112
113
114
115
116
117
118
119
120
121
122
123
124
125
126
127
128
129
130
131
132
133
134
135
136
137
138
139
140
141
142
143
144
145
146
147
148
149
150
151
152
153
154
155
156
157
158
159
160
161
162
163
164
165
166
167
168
169
170
171
172
173
174
175
176
177
178
179
180
181
182
183
184
185
186
187
188
189
190
191
192
193
194
195
196
197
198
199
200
201
202
203
204
205
206
207
208
209
210
211
212
213
214
215
216
217
218
219
220
221
222
223
224
225
226
227
228
229
230
231
232
version: "2.2"

services:
  setup:
    image: docker.elastic.co/elasticsearch/elasticsearch:${STACK_VERSION}
    volumes:
      - certs:/usr/share/elasticsearch/config/certs
    user: "0"
    command: >
      bash -c '
        if [ x${ELASTIC_PASSWORD} == x ]; then
          echo "Set the ELASTIC_PASSWORD environment variable in the .env file";
          exit 1;
        elif [ x${KIBANA_PASSWORD} == x ]; then
          echo "Set the KIBANA_PASSWORD environment variable in the .env file";
          exit 1;
        fi;
        if [ ! -f config/certs/ca.zip ]; then
          echo "Creating CA";
          bin/elasticsearch-certutil ca --silent --pem -out config/certs/ca.zip;
          unzip config/certs/ca.zip -d config/certs;
        fi;
        if [ ! -f config/certs/certs.zip ]; then
          echo "Creating certs";
          echo -ne \
          "instances:\n"\
          "  - name: es01\n"\
          "    dns:\n"\
          "      - es01\n"\
          "      - localhost\n"\
          "    ip:\n"\
          "      - 127.0.0.1\n"\
          "  - name: es02\n"\
          "    dns:\n"\
          "      - es02\n"\
          "      - localhost\n"\
          "    ip:\n"\
          "      - 127.0.0.1\n"\
          "  - name: es03\n"\
          "    dns:\n"\
          "      - es03\n"\
          "      - localhost\n"\
          "    ip:\n"\
          "      - 127.0.0.1\n"\
          > config/certs/instances.yml;
          bin/elasticsearch-certutil cert --silent --pem -out config/certs/certs.zip --in config/certs/instances.yml --ca-cert config/certs/ca/ca.crt --ca-key config/certs/ca/ca.key;
          unzip config/certs/certs.zip -d config/certs;
        fi;
        echo "Setting file permissions"
        chown -R root:root config/certs;
        find . -type d -exec chmod 750 \{\} \;;
        find . -type f -exec chmod 640 \{\} \;;
        echo "Waiting for Elasticsearch availability";
        until curl -s --cacert config/certs/ca/ca.crt https://es01:9200 | grep -q "missing authentication credentials"; do sleep 30; done;
        echo "Setting kibana_system password";
        until curl -s -X POST --cacert config/certs/ca/ca.crt -u "elastic:${ELASTIC_PASSWORD}" -H "Content-Type: application/json" https://es01:9200/_security/user/kibana_system/_password -d "{\"password\":\"${KIBANA_PASSWORD}\"}" | grep -q "^{}"; do sleep 10; done;
        echo "All done!";
      '
    healthcheck:
      test: ["CMD-SHELL", "[ -f config/certs/es01/es01.crt ]"]
      interval: 1s
      timeout: 5s
      retries: 120

  es01:
    depends_on:
      setup:
        condition: service_healthy
    image: docker.elastic.co/elasticsearch/elasticsearch:${STACK_VERSION}
    volumes:
      - certs:/usr/share/elasticsearch/config/certs
      - esdata01:/usr/share/elasticsearch/data
    ports:
      - ${ES_PORT}:9200
    environment:
      - node.name=es01
      - cluster.name=${CLUSTER_NAME}
      - cluster.initial_master_nodes=es01,es02,es03
      - discovery.seed_hosts=es02,es03
      - ELASTIC_PASSWORD=${ELASTIC_PASSWORD}
      - bootstrap.memory_lock=true
      - xpack.security.enabled=true
      - xpack.security.http.ssl.enabled=true
      - xpack.security.http.ssl.key=certs/es01/es01.key
      - xpack.security.http.ssl.certificate=certs/es01/es01.crt
      - xpack.security.http.ssl.certificate_authorities=certs/ca/ca.crt
      - xpack.security.transport.ssl.enabled=true
      - xpack.security.transport.ssl.key=certs/es01/es01.key
      - xpack.security.transport.ssl.certificate=certs/es01/es01.crt
      - xpack.security.transport.ssl.certificate_authorities=certs/ca/ca.crt
      - xpack.security.transport.ssl.verification_mode=certificate
      - xpack.license.self_generated.type=${LICENSE}
      - xpack.ml.use_auto_machine_memory_percent=true
    mem_limit: ${MEM_LIMIT}
    ulimits:
      memlock:
        soft: -1
        hard: -1
    healthcheck:
      test:
        [
          "CMD-SHELL",
          "curl -s --cacert config/certs/ca/ca.crt https://localhost:9200 | grep -q 'missing authentication credentials'",
        ]
      interval: 10s
      timeout: 10s
      retries: 120

  es02:
    depends_on:
      - es01
    image: docker.elastic.co/elasticsearch/elasticsearch:${STACK_VERSION}
    volumes:
      - certs:/usr/share/elasticsearch/config/certs
      - esdata02:/usr/share/elasticsearch/data
    environment:
      - node.name=es02
      - cluster.name=${CLUSTER_NAME}
      - cluster.initial_master_nodes=es01,es02,es03
      - discovery.seed_hosts=es01,es03
      - ELASTIC_PASSWORD=${ELASTIC_PASSWORD}
      - bootstrap.memory_lock=true
      - xpack.security.enabled=true
      - xpack.security.http.ssl.enabled=true
      - xpack.security.http.ssl.key=certs/es02/es02.key
      - xpack.security.http.ssl.certificate=certs/es02/es02.crt
      - xpack.security.http.ssl.certificate_authorities=certs/ca/ca.crt
      - xpack.security.transport.ssl.enabled=true
      - xpack.security.transport.ssl.key=certs/es02/es02.key
      - xpack.security.transport.ssl.certificate=certs/es02/es02.crt
      - xpack.security.transport.ssl.certificate_authorities=certs/ca/ca.crt
      - xpack.security.transport.ssl.verification_mode=certificate
      - xpack.license.self_generated.type=${LICENSE}
      - xpack.ml.use_auto_machine_memory_percent=true
    mem_limit: ${MEM_LIMIT}
    ulimits:
      memlock:
        soft: -1
        hard: -1
    healthcheck:
      test:
        [
          "CMD-SHELL",
          "curl -s --cacert config/certs/ca/ca.crt https://localhost:9200 | grep -q 'missing authentication credentials'",
        ]
      interval: 10s
      timeout: 10s
      retries: 120

  es03:
    depends_on:
      - es02
    image: docker.elastic.co/elasticsearch/elasticsearch:${STACK_VERSION}
    volumes:
      - certs:/usr/share/elasticsearch/config/certs
      - esdata03:/usr/share/elasticsearch/data
    environment:
      - node.name=es03
      - cluster.name=${CLUSTER_NAME}
      - cluster.initial_master_nodes=es01,es02,es03
      - discovery.seed_hosts=es01,es02
      - ELASTIC_PASSWORD=${ELASTIC_PASSWORD}
      - bootstrap.memory_lock=true
      - xpack.security.enabled=true
      - xpack.security.http.ssl.enabled=true
      - xpack.security.http.ssl.key=certs/es03/es03.key
      - xpack.security.http.ssl.certificate=certs/es03/es03.crt
      - xpack.security.http.ssl.certificate_authorities=certs/ca/ca.crt
      - xpack.security.transport.ssl.enabled=true
      - xpack.security.transport.ssl.key=certs/es03/es03.key
      - xpack.security.transport.ssl.certificate=certs/es03/es03.crt
      - xpack.security.transport.ssl.certificate_authorities=certs/ca/ca.crt
      - xpack.security.transport.ssl.verification_mode=certificate
      - xpack.license.self_generated.type=${LICENSE}
      - xpack.ml.use_auto_machine_memory_percent=true
    mem_limit: ${MEM_LIMIT}
    ulimits:
      memlock:
        soft: -1
        hard: -1
    healthcheck:
      test:
        [
          "CMD-SHELL",
          "curl -s --cacert config/certs/ca/ca.crt https://localhost:9200 | grep -q 'missing authentication credentials'",
        ]
      interval: 10s
      timeout: 10s
      retries: 120

  kibana:
    depends_on:
      es01:
        condition: service_healthy
      es02:
        condition: service_healthy
      es03:
        condition: service_healthy
    image: docker.elastic.co/kibana/kibana:${STACK_VERSION}
    volumes:
      - certs:/usr/share/kibana/config/certs
      - kibanadata:/usr/share/kibana/data
    ports:
      - ${KIBANA_PORT}:5601
    environment:
      - SERVERNAME=kibana
      - ELASTICSEARCH_HOSTS=https://es01:9200
      - ELASTICSEARCH_USERNAME=kibana_system
      - ELASTICSEARCH_PASSWORD=${KIBANA_PASSWORD}
      - ELASTICSEARCH_SSL_CERTIFICATEAUTHORITIES=config/certs/ca/ca.crt
    mem_limit: ${MEM_LIMIT}
    healthcheck:
      test:
        [
          "CMD-SHELL",
          "curl -s -I http://localhost:5601 | grep -q 'HTTP/1.1 302 Found'",
        ]
      interval: 10s
      timeout: 10s
      retries: 120

volumes:
  certs:
    driver: local
  esdata01:
    driver: local
  esdata02:
    driver: local
  esdata03:
    driver: local
  kibanadata:
    driver: local
3. Elasticsearch 기동 방법
1
docker compose up -d
4. Elasticsearch 중지 방법
1
docker compose down
5. Elasticsearch 완전 삭제 방법 (데이터까지 삭제)
1
docker compose down -v
p15. Elasticsearch 설치 및 실행(Docker 사용)
동작 확인 & 간단 CRUD (curl 예시)
보안 활성화 때문에 기본적으로 HTTPS 입니다.
테스트시 자체서명 인증 무시-k사용상태확인
1
curl -u elastic:changeme -k https://localhost:9200/
- 인덱스 생성
1
2
3
4
5
6
7
8
9
10
curl -u elastic:changeme -k -X PUT "https://localhost:9200/my-index" \
-H 'Content-Type: application/json' -d '{
  "settings": { "number_of_shards": 1 },
  "mappings": {
    "properties": {
      "title": {"type":"text"},
      "content": {"type":"text"}
    }
  }
}'
p16. Elasticsearch 설치 및 실행(Docker 사용)
동작 확인 & 간단 CRUD (curl 예시)
문서색인
1
2
curl -u elastic:changeme -k -X POST "https://localhost:9200/my-index/_doc/" \
-H 'Content-Type: application/json' -d'{"title":"안내","content":"Docker로 띄운 Elasticsearch 테스트 문서입니다."}'
- 검색
1
2
curl -u elastic:changeme -k -X GET "https://localhost:9200/my-index/_search" \
-H 'Content-Type: application/json' -d'{"query":{"match":{"content":"테스트"}}}'
(Elasticsearch의 인덱스·문서·검색 API는 공식 문서 참조)
보안·운영 주의사항
- 개발용:
discovery.type=single-node+ELASTIC_PASSWORD로 빠르게 시작 가능 - 실서비스: 보안(인증·권한·TLS)·백업·모니터링·멀티노드 설계 필요
- Elastic 8은 보안이 기본 활성화되며 자동으로 인증서/패스워드/등록 토큰을 생성
p17. Elasticsearch Python Client
- Python 검색 API 샘플 코드
- Elasticsearch + Kibana(docker-compose) 환경, Elasticsearch 기본 REST API 사용
- (http://localhost:9200, 계정: elastic/changeme)에 연결하여 문서를 색인 → 검색하는 예제
실행 전 (버전 8.x용):
1
pip install elasticsearch
- 코드 실행 시 http 주소로 인해 에러가 발생하는 경우, 아래 https 버전 코드 참고
1
2
3
4
5
6
7
8
9
10
11
12
13
14
15
16
17
18
19
20
21
22
23
24
25
26
27
28
29
30
31
32
33
34
35
36
37
38
39
40
from elasticsearch import Elasticsearch

# Elasticsearch 연결
es = Elasticsearch(
    ["http://localhost:9200"], basic_auth=("elastic", "changeme")
)

# 1) 인덱스 생성 (있으면 무시)
index_name = "my-index"
if not es.indices.exists(index=index_name):
    es.indices.create(
        index=index_name,
        body={
            "mappings": {
                "properties": {
                    "title": {"type": "text"},
                    "content": {"type": "text"}
                }
            }
        }
    )

# 2) 문서 색인
doc = {"title": "안내",
       "content": "Docker로 띄운 Elasticsearch 테스트 문서입니다."}
es.index(index=index_name, document=doc)

# 3) 검색
query = {
    "query": {
        "match": {
            "content": "테스트"
        }
    }
}
res = es.search(index=index_name, body=query)

print("검색 결과:")
for hit in res["hits"]["hits"]:
    print(hit["_source"])
https 버전 python 코드
1
2
3
4
5
6
7
8
9
10
11
12
13
14
15
16
17
18
19
20
21
22
23
24
25
26
27
28
29
30
31
32
33
34
35
36
37
38
39
40
41
from elasticsearch import Elasticsearch

# Elasticsearch 연결
es = Elasticsearch(
    ["https://localhost:9200"], basic_auth=("elastic", "changeme"),
    verify_certs=False
)

# 1) 인덱스 생성 (있으면 무시)
index_name = "my-index"
if not es.indices.exists(index=index_name):
    es.indices.create(
        index=index_name,
        body={
            "mappings": {
                "properties": {
                    "title": {"type": "text"},
                    "content": {"type": "text"}
                }
            }
        }
    )

# 2) 문서 색인
doc = {"title": "안내",
       "content": "Docker로 띄운 Elasticsearch 테스트 문서입니다."}
es.index(index=index_name, document=doc)

# 3) 검색
query = {
    "query": {
        "match": {
            "content": "테스트"
        }
    }
}
res = es.search(index=index_name, body=query)

print("검색 결과:")
for hit in res["hits"]["hits"]:
    print(hit["_source"])
p18. Elasticsearch API 매핑표 (curl ↔ Python)
인덱스 존재 여부 확인
- REST API (curl) : 없는 경우 404
1
curl -u elastic:changeme -X GET http://localhost:9200/my-index
- REST API (curl, https 기준) : 없는 경우 404
1
curl -u elastic:changeme -k -X GET https://localhost:9200/my-index
- Python (elasticsearch-py)
1
es.indices.exists(index="my-index")
인덱스 생성
- REST API (curl)
1
2
3
4
5
6
7
8
9
curl -u elastic:changeme -X PUT "http://localhost:9200/my-index" \
-H 'Content-Type: application/json' -d '{
  "mappings": {
    "properties": {
      "title": {"type":"text"},
      "content": {"type":"text"}
    }
  }
}'
- REST API (curl, https 기준)
1
2
3
4
5
6
7
8
9
curl -u elastic:changeme -k -X PUT "https://localhost:9200/my-index" \
-H 'Content-Type: application/json' -d '{
  "mappings": {
    "properties": {
      "title": {"type":"text"},
      "content": {"type":"text"}
    }
  }
}'
- Python (elasticsearch-py)
1
2
3
4
5
6
7
8
9
10
11
es.indices.create(
  index="my-index",
  body={
    "mappings": {
      "properties": {
        "title": {"type": "text"},
        "content": {"type": "text"}
      }
    }
  }
)
문서 색인 (자동 ID)
- REST API (curl)
1
2
3
4
5
curl -u elastic:changeme -X POST "http://localhost:9200/my-index/_doc" \
-H 'Content-Type: application/json' -d '{
  "title": "안내",
  "content": "테스트 문서입니다."
}'
- REST API (curl, https 기준)
1
2
3
4
5
curl -u elastic:changeme -k -X POST "https://localhost:9200/my-index/_doc" \
-H 'Content-Type: application/json' -d '{
  "title": "안내",
  "content": "테스트 문서입니다."
}'
- Python (elasticsearch-py)
1
2
doc = {"title": "안내", "content": "테스트 문서입니다."}
es.index(index="my-index", document=doc)
문서 검색
- REST API (curl)
1
2
3
4
5
6
7
8
curl -u elastic:changeme -X GET "http://localhost:9200/my-index/_search" \
-H 'Content-Type: application/json' -d '{
  "query": {
    "match": {
      "content": "테스트"
    }
  }
}'
- REST API (curl, https 기준)
1
2
3
4
5
6
7
8
curl -u elastic:changeme -k -X GET "https://localhost:9200/my-index/_search" \
-H 'Content-Type: application/json' -d '{
  "query": {
    "match": {
      "content": "테스트"
    }
  }
}'
- Python (elasticsearch-py)
1
2
3
4
query = { "query": {"match": {"content": "테스트"}}}
res = es.search(index="my-index", body=query)
for hit in res["hits"]["hits"]:
    print(hit["_source"])
p19. Elasticsearch + Kibana (Docker 사용)
- Kibana
- Elasticsearch의 데이터를 시각화·탐색·관리할 수 있는 웹 UI 도구
- Elasticsearch: “검색 백엔드”, Kibana: “관리 및 시각화 프런트엔드”
- Windows + Docker 환경에서 띄운 Elasticsearch + Kibana를 기준으로
- Kibana 접속
- 인덱스 생성 및 문서 색인
- Kibana에서 인덱스 패턴 정의
- 검색/시각화/대시보드 구축
p20. Elasticsearch + Kibana (Docker 사용)
1) Kibana 접속
- Docker Compose 실행 후 http://localhost:5601
- 로그인: elastic / changeme (docker-compose에서 지정한 값)
2) Elasticsearch에 데이터 준비
- Elasticsearch에 간단한 문서를 색인 (REST API 또는 Kibana Dev Tools Console에서 실행 가능)
- Dev Tools Console 사용예시
- Kibana 좌측 메뉴 → Management → Dev Tools → Console에서 입력
1
2
3
4
5
6
7
8
9
10
PUT my-index
{
  "mappings": {
    "properties": {
      "title": {"type": "text"},
      "content": {"type": "text"},
      "date": {"type": "date"}
    }
  }
}
1
2
3
4
5
6
POST my-index/_doc
{
  "title": "안내",
  "content": "Docker와 Kibana로 구축한 Elasticsearch 검색엔진 예시입니다.",
  "date": "2025-09-23"
}
1
2
3
4
5
6
POST my-index/_doc
{
  "title": "테스트",
  "content": "검색 기능 검증을 위한 문서입니다.",
  "date": "2025-09-22"
}
p21. Elasticsearch+Kibana(Docker 사용)
3) Kibana에서 인덱스 패턴 생성
- Kibana가 데이터를 인식하려면 Index Pattern을 정의해야 함
- Kibana 좌측 메뉴 → Management → Stack Management
- Index Patterns 선택
- Create index pattern 클릭
- 패턴 이름에
my-index*입력 date필드를 Time filter로 지정- 생성 완료
→ Discover, Visualize, Dashboard에서 my-index 데이터를 조회 가능
*Index Patterns** 메뉴가 보이지 않을 때
- Kibana 좌측 메뉴 → Management → Stack Management
- Kibana 메뉴 → Data Views → Create data view
- Name에 아무 이름 입력 (
my-index등)- Index pattern에
my-index*입력- Timestamp field에
date선택- Save data view to Kibana 클릭
4) Kibana에서 검색 및 탐색
- Discover 탭
- 좌측 메뉴 → Analytics → Discover
my-index*선택- 검색창에 쿼리 입력:
content : "검색"
- 좌측 메뉴 → Analytics → Discover
- Kibana 메뉴 → Data Views → Create data view
- Data view 우측에서 Name에 아무 이름 입력
- Index pattern에
my-index(좀 전에 입력한 data view 이름) 선택- 검색창에 쿼리 입력:
content : "검색"- 하단의 파란색 버튼 (Search entire time range) 클릭하면 검색 결과 나옴
- 필터/쿼리 예시
title: "안내"→ 제목이 “안내”인 문서 조회date:[2025-09-20 TO 2025-09-23]→ 날짜 범위 검색
p22. Kibana KQL vs. Elasticsearch Query DSL 비교표
Kibana 두 가지 검색 방식 사용
- KQL (Kibana Query Language) → Discover 화면 상단 검색창에서 입력하는 직관적인 검색 언어
- Elasticsearch Query DSL (JSON) → Dev Tools Console / Saved Search / API 요청에 사용되는 JSON 기반 검색 쿼리
특정 필드 값 일치
- KQL (검색창) :
title : "안내" - Query DSL (Dev Tools / JSON)
1
2
GET my-index/_search
{ "query": { "match": { "title": "안내" }}}
단어 포함 (match)
- KQL (검색창) :
content : "검색" - Query DSL (Dev Tools / JSON)
1
2
GET my-index/_search
{ "query": { "match": {"content": "검색" }}}
AND 조건
- KQL (검색창) :
title : "안내" AND content : "Docker" - Query DSL (Dev Tools / JSON)
1
2
GET my-index/_search
{ "query": { "bool": { "must": [ { "match": { "title": "안내" }}, { "match": { "content": "Docker" }} ]}}}
OR 조건
- KQL (검색창) :
title : "안내" OR title : "테스트" - Query DSL (Dev Tools / JSON)
1
2
GET my-index/_search
{ "query": { "bool": { "should": [ { "match": { "title": "안내" }}, { "match": { "title": "테스트" }} ], "minimum_should_match": 1}}}
날짜 범위 검색
- KQL (검색창) :
date >= "2025-09-20" and date <= "2025-09-23" - Query DSL (Dev Tools / JSON)
1
2
GET my-index/_search
{ "query": { "range": {"date": { "gte": "2025-09-20", "lte": "2025-09-23"}}}}
부분 일치 (wildcard)
- KQL (검색창) :
title : 안* - Query DSL (Dev Tools / JSON)
1
2
GET my-index/_search
{ "query": { "wildcard": {"title": "안*"}}}
p23. Elasticsearch+Kibana(Docker 사용)
- 참고자료
- Configure Elasticsearch with Docker
- Using the Docker images in production
- Beginner’s guide to Elasticsearch
- Performing CRUD operations with Elasticsearch & Kibana
- ElasticCloud
- Elastic 가이드 북
p24. 과제
- 과제내용
- Local 또는 클라우드에 도커 기반의 ElasticSearch + Kibana를 설치하고
- 30개 이상의 한국어 중심 문서/웹/블로그/뉴스 등으로 구성된 검색엔진 구축
- Python Client를 사용하여 개발
- Kibana를 적용하여 Bulk 텍스트 처리 및 색인
- 데이터 색인과 텍스트 분석 (참고: https://esbook.kimjmin.net/06-text-analysis)
- 쿼리 분석과 색인: 사용자 정의 custom analyzer 사용 (한국어 형태소 Nori Tokenizer 사용)
- 검색과 쿼리 (https://esbook.kimjmin.net/05-search)
- 검색모델: Elasticsearch BM25 모델 score 확인
- Score에 따라 Top-5 출력
- 검색엔진 구축 후 실행하고 레포트 제출
- 제출사항
- Python api 연동 source 코드
- 검색 query와 검색결과 출력파일
- 검색 성능 측정 (Precision@K, MAP, MRR, nDCG)
- 검색엔진 구축 레포트 (구축방법, 검색엔진 실행 화면, 검색성능 평가, 결론 및 문제점)
- 제출사항
- 기한
- 10월 12일 자정까지